Sunday, February 5, 2017
Tuesday, September 23, 2014

Saturday, July 19, 2014
Altered Paper Mache Jewelry Box
HELLO MY FELLOW BLOGGERS
This is my second Altered Paper Mache Jewelry Box


For the outside of the box, I had taken a 12x12 sheet of rose printed paper and cut it up to line the inside and outside of the paper mache jewelry box. I also used the same ribbon I used for the background of the mirror. The embellishments used for this project was gold pearls, off white and white flowers, cameo and gems.
Wednesday, July 16, 2014
Altered Paper Mache Book Box
Altered Paper Mache
Book Box
Hello my fellow Bloggers.I am so excited to share this Paper Mache Book Box, I received from Pinque Peacock's Crafty Kit Club

...and as you can see, I received lots of goodies.

I received two tubes of acrylic paint and mixed the blue and red together. This gave me a plum/purplish color.

Once painted, I decorated my box with paper, tissue paper, ribbons, flowers, a resin angel, bottlecaps and Rub-ons.

For the inside of the book box, I continued to decorate using the 6x6 paper and tissue paper.

Now for the front of the paper mache book box, I used rub ons which are silver/foil to decorate. I'm also making a card to go along with with book box with my left overs.
Thank You for looking and don't forget there's still time to get your July kit at:
Monday, June 30, 2014
Altered Bird House
Altered Bird House
Hello my everyone, it's been a week since I posted last which I hope everyone enjoyed.
Today, I'm sharing my Altered bird house that I turned into a business card holder.
 Above is what was in the package. Once I made sure I had everything.
I did a little sanding using a simple nail file to smooth all the edges.

Once the sanding is done, I took the individual wood pieces and painted the

This is my finished altered bird house/ business card holder.
Hello my everyone, it's been a week since I posted last which I hope everyone enjoyed.
Today, I'm sharing my Altered bird house that I turned into a business card holder.
I did a little sanding using a simple nail file to smooth all the edges.
Once the sanding is done, I took the individual wood pieces and painted the
inside one color and the outside another. After the paint dried, I glued the pieces together.
This is my finished altered bird house/ business card holder.
Thursday, June 19, 2014
Altered Jewlery Box - Pinque Peacock Challenge
Hey there friends and fellow crafty peeps.
I'm anxious to start this blogging adventure and wanted to start sharing my work.
My sweet friend, Jessica, is the owner over at Pinque Peacock and introduced me to some of the monthly challenges they host. For June the theme is Anything Goes....everyone's favorite, right?
Here is my project.

I ordered the Paper Mache' Jewelry Box from Pinque Peacock and painted it with a acrylic paint and then spray painted a glaze to give the Paper Mache Jewelry Box that special shine ........

I also added an assortment of flowers and Sprays that I purchased from Adele Garcia in Glimpz of Memories. Her flowers are gorgeous!
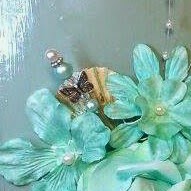
The Butterfly and Pearl Stick Pin is also a purchase from Pinque Peacock. There is a wide selection of styles and colors to select from in the shop and you should really stop over to check them all out. Jessica also works with customers who have custom order ideas!!!
Stop over to join the fun at Pinque Peacock Challenges & Link Ups. Just link up your great Anything Goes Projects for a chance to WIN some Crafty $$$ to Spend at the Pinque Peacock Shop! You don't have to use Pinque Peacock Products to PLAY ALONG, but if you do use them and share a link to their place in the shop, you get BONUS ENTRIES in the Prize Drawing!
Wahoo!
Thanks so much for visiting!!!
Subscribe to:
Posts (Atom)